Leadgeek v2
Summary
This is the current iteration of my business that’s been running for ~3 years. I overhauled the subscription (pseudo-SaaS) model from v1 in favor of a self-service, pay-as-you-go Marketplace of online arbitrage leads in Q1 2023.
The core idea behind the product is that Amazon sellers no longer have to perform their own research to find profitable items to flip from retailers. Leadgeek compiles, vets, and publishes the research to the Marketplace, which is an open repository of non-identifying product metrics and data.
Access to this data can be purchased as-needed, which scales better with the lifecycle demands of customers in this market.
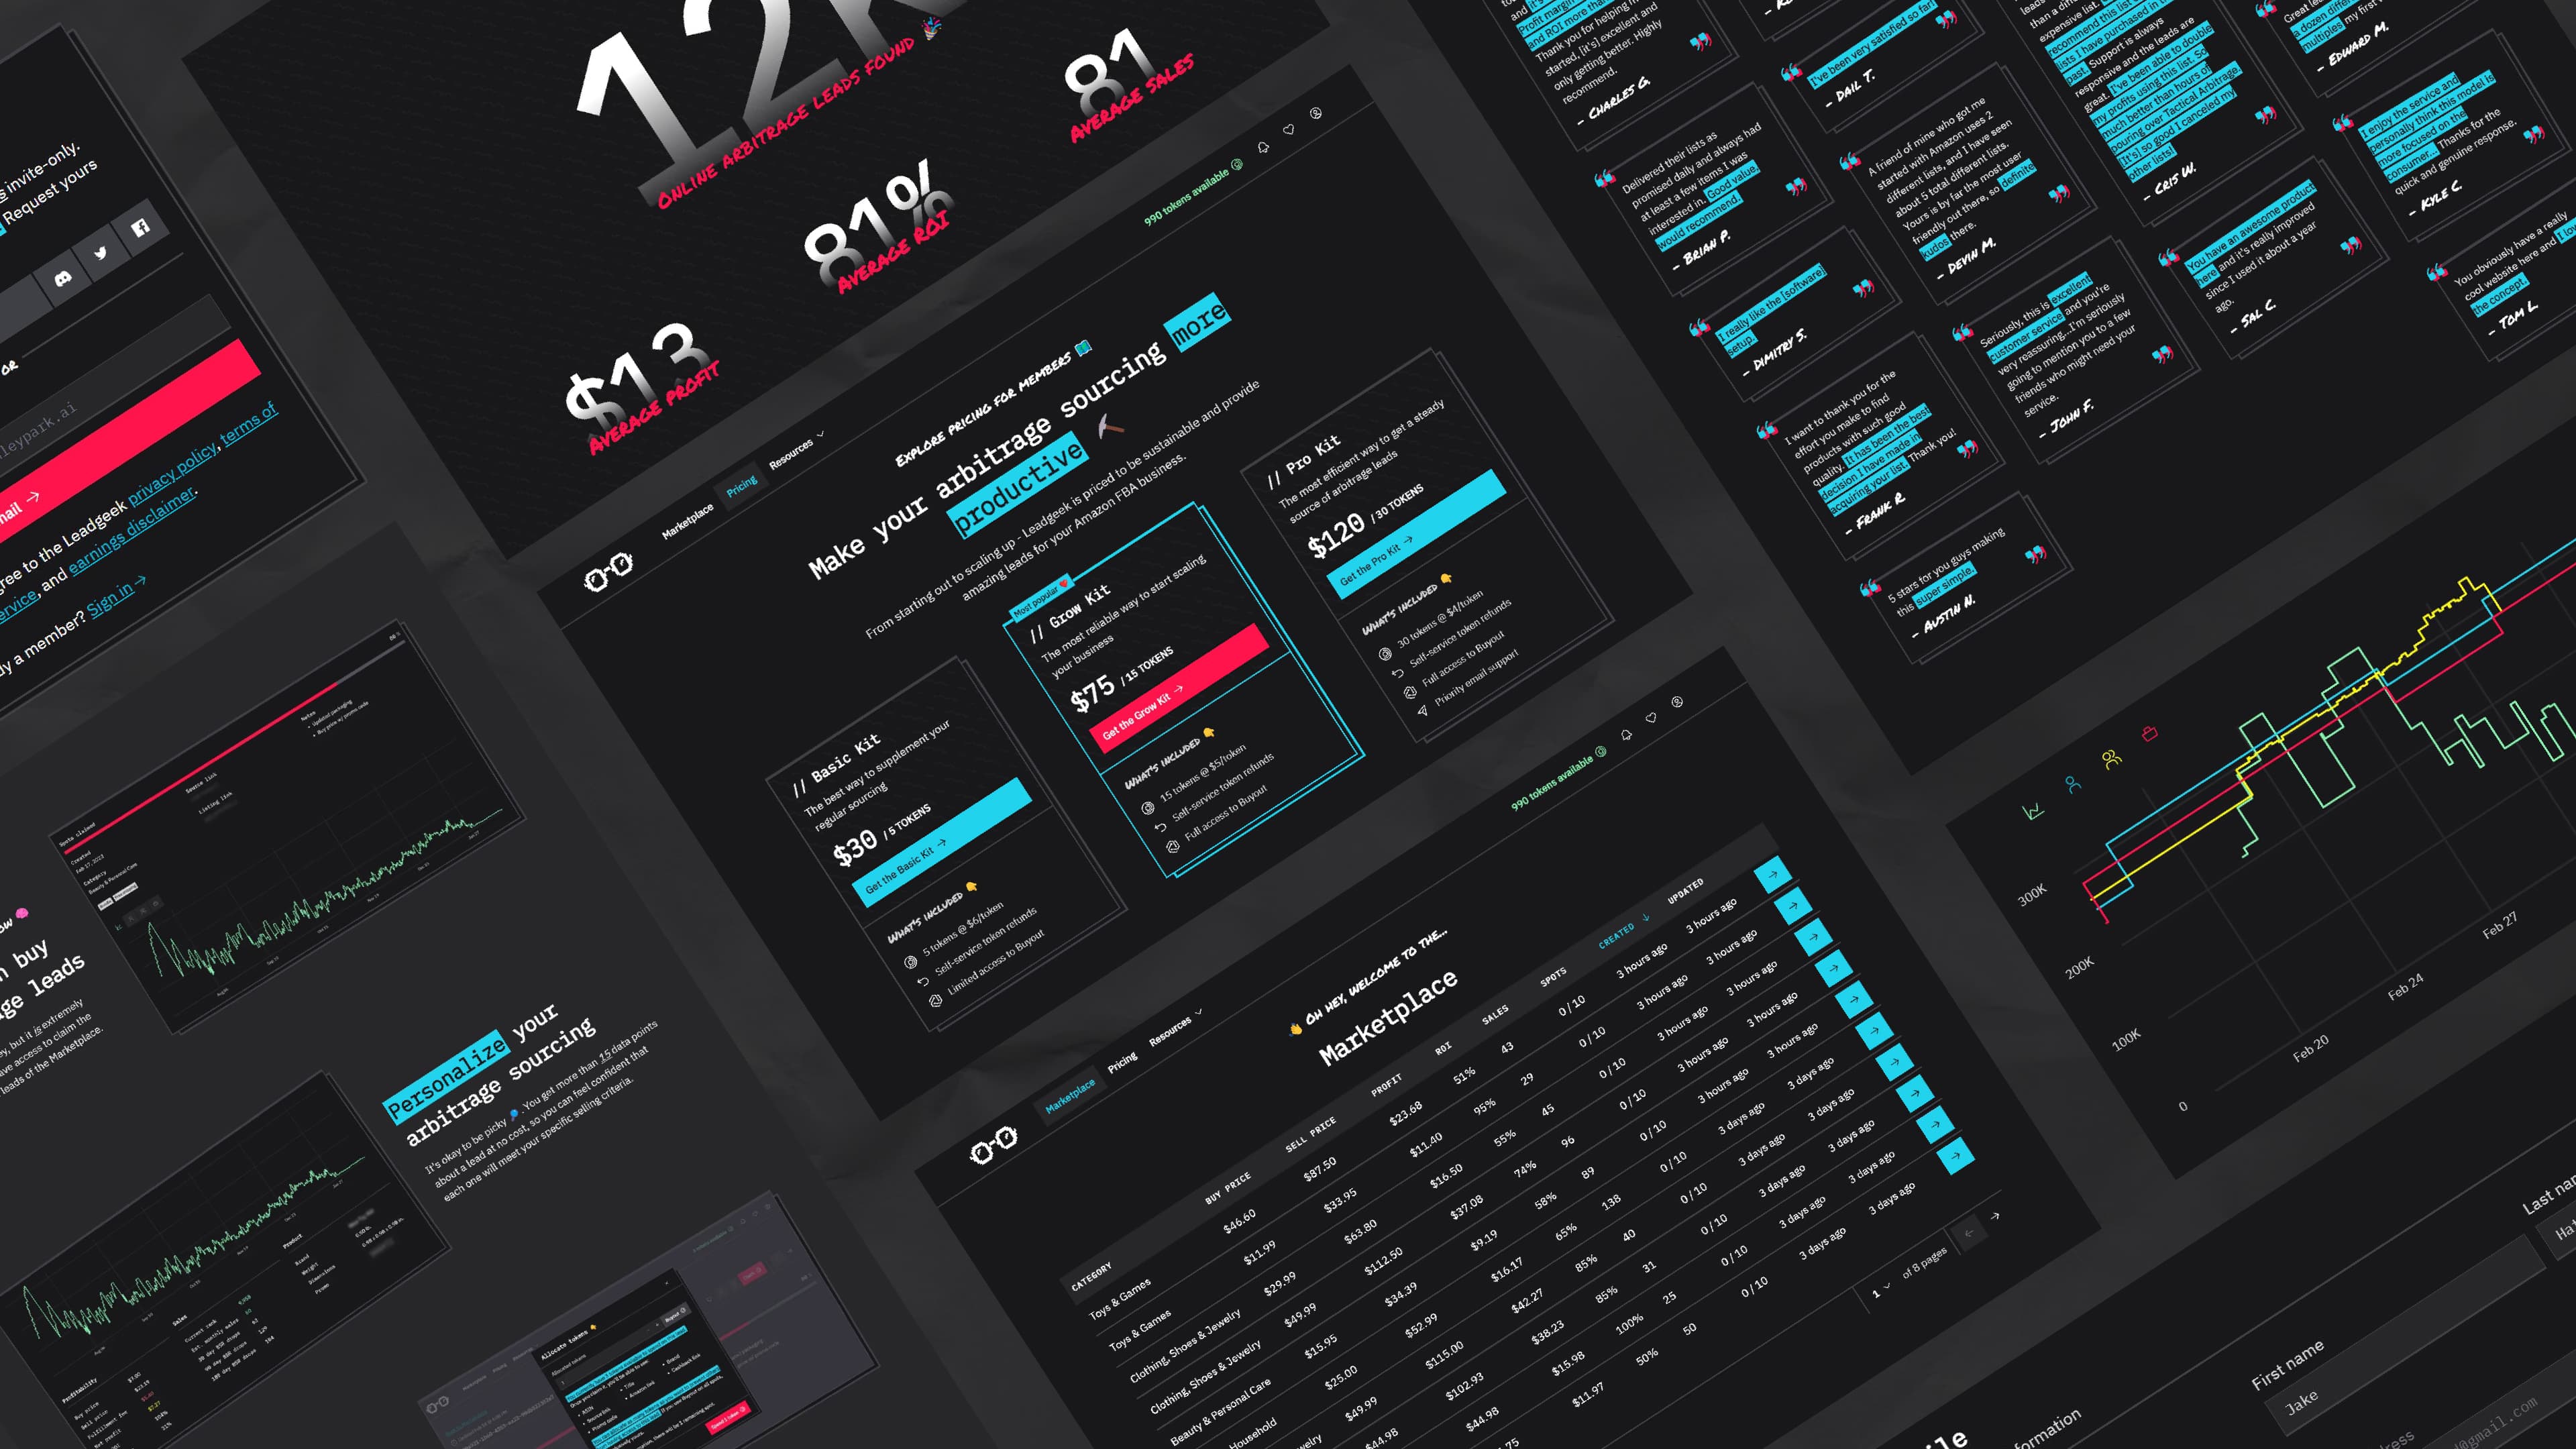
The home page's hero sectionCode for this project is in a private repository in my Github , and is available upon request .
Goals
Switching from a subscription model to a self-service model was a massive, drastic decision to make. I had dependable and consistent recurring income, and I wasn’t sure how well the new model would perform.
There were 2 considerations to me:
- The improvements for consumers
- The improvements for myself
Consumer improvements
Transparency
Simply put, I wanted to create something accessible and transparent. So many of the products that exist in this market are hidden behind expensive paywalls with highly limited or nonexistent refund policies.
Many prospective users mention how they were burned by online arbitrage lists in the past and wondered how mine was different. Since it was a software instead of a spreadsheet I was able to offer them a free trial. However, I didn’t want to devalue the product for paying users, since one of the primary factors is exclusivity.
With that exclusivity, there was a finite amount of users I could accommodate without completely undermining what they’re paying me for. I ran some calculations on the upper bound of what I could make on the subscription model compared to what I could make on the Marketplace model, and I was surprised that the Marketplace model had a 250% higher threshold.
Quality
On the subscription model, I had to meet daily quotas of product leads, whereas on the Marketplace model, I could deliver only the best leads every day. Offering a higher-quality product seemed like the better play.
Furthermore, not every product I supplied was sellable by every user. Amazon implements product restrictions per seller account, and I couldn’t guarantee that what I was supplying was fully usable with a batched list of product leads.
If users were able to obtain product leads individually, I could solve this issue by checking whether their account was unrestricted before purchasing.
Affordability
I also have plans to integrate a companion product sourcing tool in the form of a browser extension. I had started building one for Chrome using Svelte, but it didn’t feel consumer-friendly to have a subscription for product research and a subscription for product analysis. The extension pricing made more sense to me with a usage-based model, so they were only charged for the analysis they conducted.
The home page's primary features sectionPersonal improvements
Time
Another driving factor for my decision was that Leadgeek v1 was taking up a disproportionate amount of my time each day compared to the revenue it was bringing in. A typical day looked like this:
4:30-9:30- find and vet new product leads9:30-10- break10-10:30- customer support10:30-18:30- primary task for the day (most of the time this was programming a new feature, but it could also mean working on advertising, content marketing, video demo creation, etc.)18:30-20:30- break20:30-21:30- programming (every other day, usually)
Weekends included, I took 1 day off from Sep 2020 - Jan 2023, and that was the day my daughter was born.
I don’t mind the work, but the upper bounds of the revenue I was seeing wasn’t enough to offset this schedule. I learned and built amazing things with the rigorous demands I had placed on myself, but it was time for this project to become more sustainable.
Scalability
Another consideration is that I’ve learned what it’s like to conceptualize, design, build, market, and support a product. After ~3 years of working completely solo, the realization is sinking in that there’s a finite amount I can accomplish doing it all on my own. What I love is the building, and I want to focus all of my effort on it.
I’m ready to become a significant contributor to a team of other software engineers who are building something on a greater scale than I can accomplish individually.
All this to say, I was ready for Leadgeek to be on the side. For that, I needed my daily maintenance requirement to be cut down from 4 hours to less than 30 minutes, and the quota-less self-service system seemed like a win for me and the consumer.
Tech stack
I recently picked up SvelteKit for Transform Writing and loved the development experience and performance of the finished product. Therefore, I went with a very similar tech stack for v2:
- TypeScript
- SvelteKit
- Supabase
- TailwindCSS
- Amazon Selling Partner API
- Layer Cake
- D3.js
- Stripe
- Maizzle
- SendGrid
- Sentry
- Vitest
- Playwright
- Github Actions
- Vercel
TypeScript and SvelteKit
Like Next.js, SvelteKit allows some flexibility on what’s rendered server-side and what’s rendered client-side. Rather than having a separate marketing website and web app, I decided to combine the 2 to create a more seamless experience.
The primary reason why I did this is to allow prospective users to see the kinds of product leads I’m posting to the Marketplace. With this transparency, the only information that’s withheld is identifying information about each product. This way, people can feel more confident in the quality of product they’re purchasing.
TailwindCSS
I went with TailwindCSS because it’s what I can develop the most quickly with. I love it, and if I have the choice, it’s what I’d use on every project.
Supabase
I implemented Supabase on Transform Writing and loved the relational database aspect and abstracted auth. I wanted to do some social provider OAuth on this project, so Supabase made it really simple.
Amazon Selling Partner API
The Amazon Selling Partner API (SP-API) integration was a must. It took a little bit to get going, but the ability to let users know which products are unrestricted for them without revealing identifying information about the leads was a game changer. No other service in the market does this.
I later used this mandatory integration to verify the uniqueness of a user’s Leadgeek account. It also allowed me to provide a one-of-a-kind feature in the form of a daily, personalized email which notifies members about which new leads are ungated for their Seller Central account.
An example lead page that uses D3.js and Layer CakeLayer Cake and D3.js
I went with Layer Cake and D3.js for displaying a graphical representation of historical information about each lead on the Marketplace.
This information is widely accepted as the standard format for product analysis for Amazon sellers in a tool called Keepa . I wanted to show the same level of information but not have to expose its identifying details. The only way to do that was to use Keepa’s API and render my own interactive graph. Ya gotta do what ya gotta do.
Stripe
Stripe for payments. No subscriptions to manage, which made access to the login-protected areas a bit easier than normal.
An example email that uses the Amazon SP-API to notify a user of their ungated productsMaizzle and SendGrid
I went with Maizzle for creating emails that were sent via SendGrid. I chose it because it’s based on TailwindCSS, which I was already familiar with, but I took it a step further with Markdown.
In Maizzle I created 2 base templates, 1 for transactional emails and 1 for promotional emails. The content of these emails was written completely in Markdown and styled using TailwindCSS so I can interate and create new emails extremely easily.
Code for these email templates is in repository on my Github .
Sentry, Vitest, Playwright, and Github Actions
I chose Sentry, Vitest, Playwright, and Github Actions for error monitoring, unit tests, integration tests, and CI, respectively.
Vercel
I deployed the site via Vercel, which has been a breeze to use.
Overview
The pay-as-you-go model took a lot of thought. Specifically, I wanted to revolutionize the current way of conducting and disseminating arbitrage product research, but I didn’t want to alienate potential users with a hard-to-learn system.
I had to think carefully about what features to include in this system and how to explain it to not only my existing users, but to new ones as well.
Here is a basic summary of what I came up with:
Product systems
The MarketplaceAll product leads are publicly available on the Marketplace , with identifying information redacted. This information is stripped server-side, and no identifying data (namely, the Amazon Standard Identification Number, or ASIN) is sent in any server requests. This is to prevent anyone from reverse-engineering the product’s identity or source.
Leads are fetched from a view of the fully-sensitive leads table in Supabase that’s removed any sensitive fields. These critical information areas are obfuscated on the arbitrage lead pages with a simple CSS blur filter, but the information is not really even present on the page being rendered. For example, if someone were savvy enough to disable the blur style via their browser’s dev tools to try to obtain the Amazon link, they’d see a link to a book about ethics instead.
Only a minimum amount of information has to be stored in my database about each lead since almost all the dynamic information is retrieved in real-time via Keepa’s API. Initially, I requested this information server-side, but the Keepa API takes a few seconds to fetch the data. The slow page speed was annoying, so I decided to fetch it client-side and use skeleton placeholders while loading.
The claim modalTo obtain access to the identifying information of each product lead, you can exchange a token, which is the currency of Leadgeek’s Marketplace. The price of a token varies, since there are discounts for purchasing in bulk.
Access to the identifying details for each lead is limited (currently at 10 spots, with 1 token = 1 spot) to prevent competition over saturation. In fact, to prevent any other sellers from seeing a lead you love, you can buy out all the other spots and make the product lead exclusively yours.
In case there’s more than one concurrent connection to the same lead page, token redemptions are updated live with Supabase’s listener on database table updates. The behavior is much like a stock price-tracking app, reflecting updates in real-time via a Webhook.
You can navigate to the previous and next leads directly through each lead page.
The last viewed page and sorting preferences from the Marketplace are stored as URL query parameters while viewing individual lead pages so that your state in the Marketplace is preserved.
From the transaction history modal, you can request a token refund within 15 minutes of redemption. This will re-allocate tokens to your account and reset the number of redemptions for the lead.
Settings systems
The profile pageProfile
The profile area is pretty standard: update your name, phone number, and notifications preferences. In order to get the notifications preferences working correctly, though, I had to set up a webhook for SendGrid. Here was my analysis for the feature:
- There are two directions for updating email notification preferences. The first is from Leadgeek → SendGrid, but it could also flow from SendGrid → Leadgeek if someone were to click the “unsubscribe” link in the footer of a promotional email.
- User’s notification preferences are stored in Supabase in their own table, but these booleans don’t actually impact whether or not users get emails in SendGrid.
- The only way to integrate properly is to set up a listener webhook for SendGrid and subscribe/unsubscribe in SendGrid’s contact lists and update the values in Supabase.
And it works like a charm.
The billing pageBilling
Tokens can be added to your Wallet from the billing page. You can either navigate there directly and click “add tokens” or by pre-selecting a package of tokens from the pricing page.
It’s a simple 2-step modal. The first step prompts the user to select a plan and the second step is the details review and submission.
You can initiate the checkout process without having a payment method associated with your account, though it’s a requirement to add on the second step.
The payment method modal is simply a custom Stripe elements form.
The favorites pageFavorites
If you’re logged into your Leadgeek account, you can favorite a lead. It will show up in your Favorites panel in the header and the Favorites area in the settings pages.
The portfolio pagePortfolio
If you purchase a lead, the identifying information is immediately revealed. Your transaction history for this lead is updated in the modal for this lead’s page and the lead is added to your Portfolio in the settings pages.
Notifications
Global and individual notifications can be created by admins to communicate to users important messages. Notifications can be checked in the respective panel in the header.
Affiliate system
I created an affiliate system from scratch for the v1 app, which I was able to port over to v2. This system is quite a bit cleaner since the marketing site and web app are no longer separate. I also simplified the approval process by allowing anyone with a Leadgeek account to be automatically granted an affiliate link.
Admin systems
Lead update
An important feature I added was the lead update system in the admin panel. The information for each lead inevitably changes as retailers change their price, things go in and out of stock, or promo codes expire.
After a few days of updating the table directly in Supabase, I created something more enjoyable to use for editing lead information. All the stored fields in the table can be edited in a modal, and the lead can also be taken completely off the Marketplace in case it’s no longer valid.
Member approval
The current state of the member approval system is a table of each new applicant displaying their email, the date of application, and whether or not they’ve linked their Seller Central account.
There are two buttons associated with each applicant, to “approve” or “deny.” Each button sends an email with content reflecting the intent.
If the applicant linked their Seller Central account, it’s an immediate approval. If not, I’ll email them a few times reminding them to do so, and eventually reject their application.
Marketing systems
The documentation pageDocumentation
I enjoy writing an article more than creating a video. It’s just so much more maintainable to make a small edit to text rather than re-shooting or re-editing video content.
For this reason, and since my product is such a new concept in this market, I wanted to create a compounding body of work to minimize support drain over time. I didn’t want to be asked the same question over and over again.
I’m happy to answer those emails, but if multiple people are confused about how some feature works, that’s on me, not them. So to clarify things, I made a documentation system that’s slowly growing.
It’s not just user-facing, but also internally-facing in case I’m able to hire more people to help me with this project in the future.
A documentation exampleAnalytics
I hate Google Analytics, I really do. Nothing is ever free, and using GA makes your users Google’s product. Not only that, but you have to display abrasive cookie banners to comply with GDPR. Ick.
I opted for Umami, which is a privacy-focused, self-hosted tool. I run it on a Raspberry Pi 4. One of the most massive advantages I hadn’t considered when switching is that I get significantly better anonymous data since I can serve my analytics script from a custom domain not on a blocklist.
Showcase
Product
The home page's secondary features and testimonials section The home page's FAQs and call-to-action section The pricing page The sign up pageSettings
The selling pageResources
The about page The contact page The FAQ page A blog post example The changelog page A changelog example The Amazon supplier list The IP claim databaseHindsight
Technical
Maybe it’s a sign of growth that I don’t have any technical regrets with this project. I’m actually quite fond of it’s design, uniqueness as a product, helpfulness to the Amazon selling community, and technical implementation. I guess it could use more test coverage, but I’ll do some regression testing as I go through Sentry error reports.
Business
Free trials
A business regret I have, however, is in free trial system I launched v2 with. I anticipated some level of abuse, and created measures like unique emails and IP addresses for sign up and unique payment methods for accounts - it just wasn’t enough.
I struggled with corralling obviously fraudulent signups for about 2 weeks before I instituted an invite-only system. In order for your request to be accepted, you must integrate your Seller Central account via the SP-API. Once linked, I store your unique Selling Partner ID in my database and allocate your free tokens to spend on the Marketplace.
Fraud has been cut down to zero, but legitimate signups have been affected as well. A majority of people don’t link their Seller Central account, so I need to create a drip email campaign to encourage them to do so.
Token refunds
Additionally, since tokens are refundable within 15 minutes of redemption (a Cron job runs in Supabase and updates these things every minute), I don’t want that system to be abused either. In theory, a bad actor could infinitely redeem and refund the same token for access to every lead I ever offer.
In reality, this won’t happen. I send every refund submission to a dedicated Slack channel via webhook with details about the lead, refund reason, and initiator, which are reviewed by an admin. The next iteration of this process will probably look like a trust score system.
Every new member starts with a trust score of 0.5, and every refund feedback they submit will be reviewed. If the feedback is genuine, their trust score increases. Likewise, if the refund feedback is fraudulent (fake to get the token back), their trust score decreases.
My idea is that any member with a trust score below a certain threshold will need to submit their refund request for manual approval. Basically, if you abuse the system, you’re out.
Similarly, any feedback submission from a highly trusted member will get priority attendance, since it’s more likely that something has become out of date with the lead since the original time it was posted to the Marketplace.
The ASIN auto ungating listUnexpected success
On positive news, something that I wasn’t expecting to take off as much as it did was the free auto ungate list. It’s essentially a list of ASINs that have a higher-than-average change to ungate your Seller Central account in a brand or category. It’s been a huge hit to attract new members, so much so that I’ve turned off Google Ads in favor of some free SEO.
Wrapping up
Leadgeek v2 has done what it’s needed to: stay sustainable and growing. Pulling the plug on $70k ARR was a tough decision to make, but the right decision for me at this point in time.
I feel there would be diminishing returns in my personal growth to stick with this project full-time, which is why it’s nice to reap the rewards of its success long-term now that it’s maintainable on the side.
I’m ready to make the next step in my software engineering career, and that means contributing to a bigger project in a team. It’s a very exciting thought.
The predecessors of this project are the v1 site and the v1 app. Since putting this together, I’ve been investing my time into Graphene, a highly opinionated Next.js starter and Doom Scheme, a React Native app for composing and sharing your next rap verse.